You must be signed in to read the rest of this article.
Registration on CDEWorld is free. You may also login to CDEWorld with your DentalAegis.com account.
The success of adhesively bonded restorations is hinged on following a careful clinical procedure, including the design of the preparation, the protocol used for achieving adhesion, the management of polymerization stress when placing the restoration, and the long-term maintenance of the restoration. The bonding protocol is a critical step in this procedure, with several technique-sensitive steps. In order to better understand each step, a basic review of the mechanisms of bonding to enamel and dentin will be presented first.
In theory, enamel bonding is straightforward. Phosphoric acid is applied to enamel to selectively remove certain hydroxyapatite mineral formation. Once applied, the adhesive closely adapts to the textured enamel surface and creates adhesion through micromechanical retention. When used in a self-etch mode, acid monomers in the adhesive dissolve surface mineral from the enamel to form surface texture.
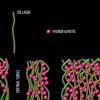
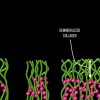
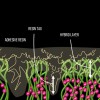
Dentin bonding is more complicated. In an etch-and-rinse mode, phosphoric acid is used to selectively remove hydroxyapatite mineral from dentin (Figure 1 and Figure 2), leaving behind a matrix of collagen in a bed of water (Figure 3). A hydrophilic primer (two-bottle system) or adhesive (one-bottle system) is then applied to this demineralized collagen to infiltrate it. (Table 1 provides definitions of one- and two-bottle systems.) In a two-bottle system, a hydrophobic adhesive is then placed. Polymerization of the adhesive around the collagen forms the "hybrid layer," the key to dentin bonding (Figure 4). Additionally, some of the bond is formed through polymerized adhesive in dentinal tubules, referred to as dentin tags (Figure 4). A similar process occurs when self-etching dentin, except that the acidic monomers in the adhesive simultaneously dissolve surface mineral and infiltrate the demineralized collagen.
Each step of this process may affect the quality of the bond and should be performed with attention to detail. A consensus statement developed at the 2017 International Symposium on Light Sources in Dentistry, organized by Richard B. Price, DDS, PhD, focused on each step of the bonding process.1 This review will loosely follow the recommendations from that consensus statement and cover common areas of concern encountered throughout the bonding procedure.
Effects of Excess Etching Times
Dentin contains approximately 50% mineral content, whereas enamel is more highly mineralized (87%).2 Instructions for most adhesives recommend etching enamel and dentin for 15 seconds. In several laboratory studies, over-etching enamel for up to 60 seconds did not reduce its bond.3,4 Dentin is more sensitive to etching time. Several studies have shown that etching dentin beyond 15 seconds causes a reduction in bond strength.5,6 When dentin is over-etched, there is deeper demineralization of collagen, into which it is more difficult for the adhesive resin to penetrate. The remaining demineralized dentin zone without resin impregnation is a weak link in the bonding interface.6 There is some evidence that a 30-second etching time could be more effective for the dentin of older patients (55 to 60 years) than younger patients (18 to 22 years).7 Bonding can be a challenge to sclerotic dentin, which is hypermineralized dentin often appearing as dark dentin in non-carious cervical lesions or under caries. In laboratory studies, increased etching times on sclerotic dentin showed no improvement or reduction in bond.8,9 An improvement in bond to sclerotic dentin was achieved by roughening the surface with a bur.9
Benefits of Treating Preparation With Antibacterial or Collagen Cross-linking Agent
Many clinicians have incorporated chlorhexidine or glutaraldehyde-based solutions into their bonding protocol with the hope of killing bacteria, reducing sensitivity, or inactivating bond-degrading enzymes. Solutions of 2% chlorhexidine in alcohol are commonly used before bonding. Oral rinse solutions of 0.12% chlorhexidine gluconate, however, should not be used in cavity preparations because they contain surfactants, flavorings, and other additives that should not be applied to the tooth before bonding. One benefit of using a 2% chlorhexidine solution is that it has been shown to reduce the presence of Streptococcus mutans in demineralized dentin after a 5-minute application time.10 Another benefit of 2% chlorhexidine is its ability to inactivate matrix metalloproteinases (MMPs). MMPs are enzymes naturally present in dental collagen that are released when dentin is etched. These enzymes can cleave collagen fibrils below the hybrid layer and degrade the dentin bond.11 By chelating active sites on these enzymes, chlorhexidine application has been shown to improve long-term dentin bonds.12 The MMPs are activated after application of phosphoric acid, so a chlorhexidine rinse should be incorporated into a bonding protocol after acid etching.
Another solution commonly used in bonding protocols is a mixture of glutaraldehyde and hydroxyethylmethacrylate (HEMA). This solution acts as a desensitizer by coagulating proteins within dentinal tubules.13 Additionally, glutaraldehyde is capable of cross-linking collagen. Collagen cross-linking has the potential to strengthen the collagen network, protect collagen from MMPs, and even inactivate MMPs still bound to collagen. These beneficial effects are realized on demineralized collagen.11 Therefore, application of a glutaraldehyde-containing solution should be performed after etching and chlorhexidine rinse (if used). There has been some evidence that glutaraldehyde may also have an antibacterial action.14
Effects of Dentin Wetness After Rinsing Etchant
After the phosphoric acid is rinsed off, the demineralized collagen becomes embedded by the residual water. In this state, the collagen network is expanded by water molecules. It is necessary to remove excess water so that the adhesive (which is at least partially hydrophobic) may infiltrate the collagen network. However, if the dentin is overdried, the collagen will collapse, known as desiccation, and it will not accept infiltration by the adhesive (Figure 5). The ideal wetness of dentin to accept adhesive application is "moist" or "blot dried." There are different clinical methods to achieve this level of wetness, including blot drying with cotton or carefully drying with an air-water tip several inches from the cavity preparation. When using chlorhexidine or glutaraldehyde-based solutions, they can be used as a rewetting agent. These solutions should be left moist on the surface of dentin without being rinsed off before adhesive application.
Different adhesives may be more tolerant to variations in dentin wetness. Many of the etch-and-rinse and universal adhesives contain water within the bonding agent, from 3 to 25 vol%. Adhesives with higher water content are less affected by leaving dentin dry.15 However, the water within the adhesive must be evaporated before light-polymerization. Self-etch bonding agents do not require keeping dentin moist, likely because the dentin is simultaneously demineralized and infiltrated with adhesive.16 These differences in composition between adhesives emphasize the importance of following the manufacturer's instructions for each material.
Benefits of Self-Etching
Some of the technique sensitivity of etching dentin with phosphoric acid may be avoided by using a self-etching adhesive that simultaneously etches and infiltrates dentin. Self-etching enamel requires an adhesive that is sufficiently acidic to remove any smear layer and partially etch enamel. There is some clinical evidence that mildly acidic self-etch adhesives do not sufficiently etch enamel and lead to premature marginal discoloration.17 Using a selective-etch technique is a method to take advantage of the benefits of self-etching dentin while achieving a reliable etching pattern on enamel. In this technique, phosphoric acid is applied only to the enamel margin (Figure 6).
Benefits of Agitating Adhesive
Application of the adhesive should be an active process in which the adhesive is scrubbed into the preparation. Laboratory studies have shown improved bond strength when the adhesive was agitated.18,19 Agitation of the adhesive showed a larger improvement in bond strength than extending application time beyond the manufacturer's recommendations.19 Some adhesives have a thicker consistency than others due to incorporation of filler particles (Figure 7 and Figure 8). Although thicker adhesives may produce more unwanted flash, a disadvantage of thinner adhesives is that they may require multiple coats of application.20
Effect of Sufficient Evaporation of Solvent Within the Adhesive
Most current adhesives contain some water and either an ethanol or acetone solvent. If the water and solvents are not evaporated, they can inhibit the polymerization of the resin monomers in the adhesive. Manufacturer's instructions typically recommend gentle air-drying from 5 to 10 seconds. A recent study reported an increase in bond strength of several adhesives when the drying time was increased to 15 seconds.21 Clinically, the adhesive should appear as a shiny surface and should stop moving after the solvent is adequately evaporated. Additionally, the air used to evaporate the solvent should be free of water. Water-free air can be assured by spraying air against a flat surface until there are no longer drops of water visualized.
Effect of Insufficient Curing of the Adhesive
Light-curing the adhesive before placement of a composite restoration will ensure that the adhesive monomers have fully polymerized to obtain an ideal bond to tooth and full strength of the adhesive layer. One challenge in the adhesive bonding protocol is when deep preparations prevent the tip of a curing light from closely approximating the surface being cured. This clinical challenge is often realized in the boxes of Class II preparations. A laboratory study showed that placing the tip of the curing light 6.9 mm, 4.6 mm, or 2.3 mm away from the surface being cured reduced bond strength to 21%, 37%, or 58% of the maximum bond strength to dentin, respectively (Figure 9).22 The reduction in bond strength may be particularly devastating because many clinicians have witnessed Class II composite restorations fail starting at the depth of the box, which is a high-risk area for caries. To get sufficient light energy to these deep areas of the preparation, the clinician should increase the curing time of the adhesive. In the laboratory study, doubling or tripling the light-curing time on surfaces up to 6.9 mm distant from the tip of the curing-light tip was effective in returning the bond strength to the maximum value.22 It is always important to ensure that the curing light is angled to place the tip parallel to the surface being cured and that the curing light has at least the minimum irradiance (power) recommended in the instructions of the adhesive.
Effect of Bonding-Agent Contamination
A key factor in achieving a good adhesive bonding is achieving good isolation. The gold standard of isolation is a rubber dam. A rubber dam not only helps to prevent contamination from saliva and blood, it also displaces oral tissue, prevents aspiration or ingestion of discarded dental materials, and reduces oral humidity. However, a 2013 practice-based research study reported that only 12% of 9,890 direct restorations placed in dental clinics were performed with a rubber dam.23 Most restorative dentists are not routinely using a rubber dam for adhesive bonding procedures, so there should be extra attention to ensure that the preparation is not contaminated with blood or saliva.
If bleeding occurs before bonding, one method to stop the bleeding is to use a ferric sulfate or aluminum chloride-containing hemostatic agent. The precipitates from these hemostatic agents can also negatively influence the bond to dentin. A review of methods for cleaning hemostatic agents found that a 60-second application of ethylenediaminetetraacetic acid (EDTA) or 15-second application of phosphoric acid, both followed by water spray, were effective methods for cleaning dentin.24
If the bonding agent becomes contaminated with saliva during the bonding procedure, it is important to stop the procedure and follow any manufacturer's instructions for remedying a contaminated bonding step. In the absence of manufacturer's recommendation, several generalizations will be presented to handle salivary contamination after each step.25,26 If contamination occurs after etching before adhesive application, the preparation should be rinsed and then returned to a moist surface without re-etching. If contamination occurs after application of the adhesive before light-polymerization, the preparation should be rinsed and the adhesive reapplied. If contamination occurs after the adhesive is light-cured, the preparation should be rinsed and thoroughly dried, and then composite placement may commence without reapplying the adhesive.
Summary
The steps presented in this article may seem to be just a small part of a restorative procedure. Yet it is hoped that the reader has an appreciation for the small details that can help to achieve a strong bond to the tooth and prolong the lifetime of this bond.
About the Author
Nathaniel C. Lawson, DMD, PhD, is assistant professor, Department of Clinical and Community Sciences, Division of Biomaterials, University of Alabama at Birmingham School of Dentistry, Birmingham, Alabama
References
1. Strassler HE, Alkhubaizi Q, Ganesh N. Reimagining dental bonding: predictable restorations for patients. Compendium eBook. 2018;Nov:1-9.
2. Hariri I, Sadr A, Nakashima S, et al. Estimation of the enamel and dentin mineral content from the refractive index. Caries Res. 2013;47(1):18-26.
3. Kimmes NS, Barkmeier WW, Erickson RL, Latta MA. Adhesive bond strengths to enamel and dentin using recommended and extended treatment times. Oper Dent. 2010;35(1):112-119.
4. Barkmeier WW, Erickson RL, Kimmes NS, et al. Effect of enamel etching time on roughness and bond strength. Oper Dent. 2009;34(2):217-222.
5. Hashimoto M, Ohno H, Kaga M, et al. Over-etching effects on micro-tensile bond strength and failure patterns for two dentin bonding systems. J Dent. 2002;30(2-3):99-105.
6. Hashimoto M, Ohno H, Endo K, et al. The effect of hybrid layer thickness on bond strength: demineralized dentin zone of the hybrid layer. Dent Mater. 2000;16(6):406-411.
7. Lopes GC, Vieira LC, Araújo E, et al. Effect of dentin age and acid etching time on dentin bonding. J Adhes Dent. 2011;13(2):139-145.
8. Camargo MA, Roda MI, Marques MM, de Cara AA. Micro-tensile bond strength to bovine sclerotic dentine: influence of surface treatment. J Dent. 2008;36(11):922-927.
9. Mena-Serrano AP, Garcia EJ, Perez MM, et al. Effect of the application time of phosphoric acid and self-etch adhesive systems to sclerotic dentin. J Appl Oral Sci. 2013;21(2):196-202.
10. Borges FM, de Melo MA, Lima JP, et al. Antimicrobial effect of chlorhexidine digluconate in dentin: in vitro and in situ study. J Conserv Dent. 2012;15(1):22-26.
11. Felton D, Bergenholtz G, Cox CF. Inhibition of bacterial growth under composite restorations following GLUMA pretreatment. J Dent Res. 1989;68(3):491-495.
12. Mazzoni A, Tjäderhane L, Checchi V, et al. Role of dentin MMPs in caries progression and bond stability. J Dent Res. 2015;94(2):241-251.
13. Montagner AF, Sarkis-Onofre R, Pereira-Cenci T, Cenci MS. MMP inhibitors on dentin stability: a systematic review and meta-analysis. J Dent Res. 2014;93(8):733-743.
14. Yilmaz NA, Ertas E, Orucoğlu H. Evaluation of five different desensitizers: a comparative dentin permeability and SEM investigation in vitro. Open Dent J. 2017;11:15-33.
15. Tsujimoto A, Shimatani Y, Nojiri K, et al. Influence of surface wetness on bonding effectiveness of universal adhesives in etch-and-rinse mode. Eur J Oral Sci. 2019;127(2):162-169.
16. Chiba Y, Rikuta A, Yasuda G, et al. Influence of moisture conditions on dentin bond strength of single-step self-etch adhesive systems. J Oral Sci. 2006;48(3):131-137.
17. Lawson NC, Robles A, Fu CC, et al. Two-year clinical trial of a universal adhesive in total-etch and self-etch mode in non-carious cervical lesions. J Dent. 2015;43(10):1229-1234.
18. do Amaral RC, Stanislawczuk R, Zander-Grande C, et al. Bond strength and quality of the hybrid layer of one-step self-etch adhesives applied with agitation on dentin. Oper Dent. 2010;35(2):211-219.
19. Velasquez LM, Sergent RS, Burgess JO, Mercante DE. Effect of placement agitation and placement time on the shear bond strength of 3 self-etching adhesives. Oper Dent. 2006;31(4):426-430.
20. Chang BJ, Lawson NC, Burgess JO. Effect of adhesive coats and solvents on bond strength. J Dent Res. 2015;94(spec iss A):3385.
21. Luque-Martinez IV, Perdigão J, Muñoz MA, et al. Effects of solvent evaporation time on immediate adhesive properties of universal adhesives to dentin. Dent Mater. 2014;30(10):1126-1135.
22. Xu X, Sandras DA, Burgess JO. Shear bond strength with increasing light-guide distance from dentin. J Esthet Restor Dent. 2006;18(1):19-27; discussion 28.
23. Gilbert GH, Litaker MS, Pihlstrom DJ, et al; DPBRN Collaborative Group. Rubber dam use during routine operative dentistry procedures: findings from the dental PBRN. Oper Dent. 2010;35(5):491-499.
24. Bernades Kde O, Hilgert LA, Ribeiro AP, et al. The influence of hemostatic agents on dentin and enamel surfaces and dental bonding: a systematic review. J Am Dent Assoc. 2014;145(11):1120-1128.
25. Justin RM, Paranthaman H, Rajesh AG, et al. Effect of salivary contamination on the bond strength of total-etch and self-etch adhesive systems: an in vitro study. J Contemp Dent Pract. 2012;13(5):655-660.
26. Park JW, Lee KC. The influence of salivary contamination on shear bond strength of dentin adhesive systems. Oper Dent. 2004;29(4):437-442.


